Low Light by Chelsea Wert
- Angie Mahlke

- Dec 4, 2019
- 6 min read
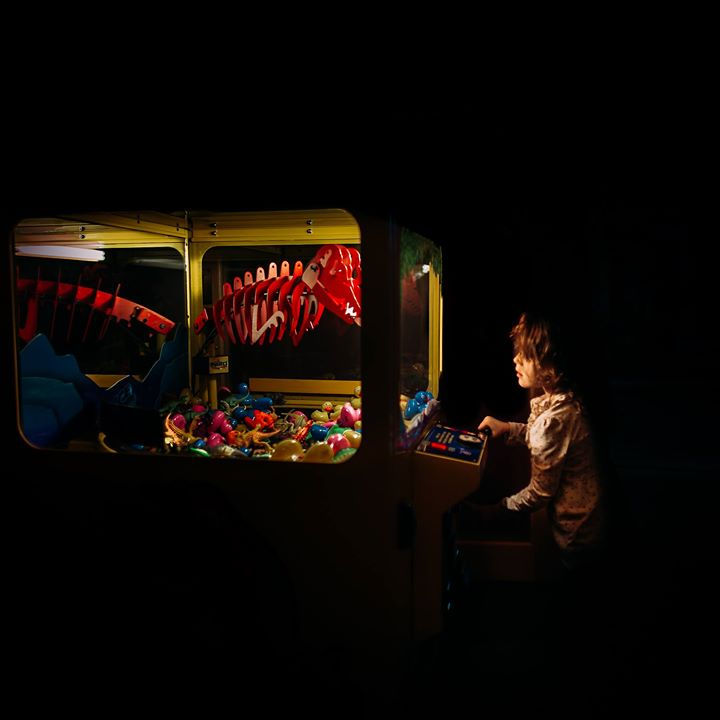
Hello everyone! My name is Chelsea from @aspoonfulofwhimsyphotography and I’m so excited to be here to share some of my strategies for shooting in low light.

Equipment I use:
I have listed below the equipment I use, this by no means is what you have to use. There are tons of lenses out there, find the one that fits your style best. I personally prefer to shoot with a wide angle lens which I feel enhances a storytelling vibe, the 24 being my favorite. I only use available light, I do not use a flash.
-Canon 6D
-Canon 24 1.4 II
-Sigma 35 1.4 Art
-Canon 100 2.8 L Macro
Choosing a Location:
-Choose 1 natural or artificial light source (ex. sliding glass door, kitchen window, pocket of light on the floor, lamp, fishtank, flashlight, setting sun, etc.) I do not recommend mixing artificial and natural light.
-Block out all other light (if needed, hang curtains or blankets over other windows)
-Declutter space (if time allows) this just makes post processing easier.

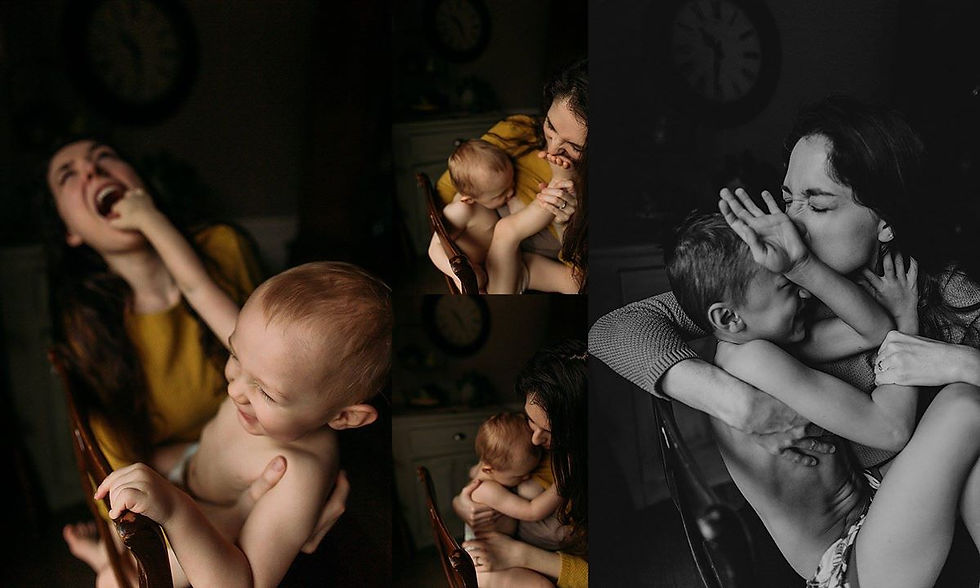
Encouraging Play:
Since I am mostly documenting my children at play, I prefer to purposefully setup an aesthetically pleasing, open-ended activity that will keep their interest. Also, because I aim for very dramatic Rembrandt-like lighting, positioning is very important. The more engrossed in an activity my subjects are the greater the chance I can physically slide them into the right angle without disrupting their play. My favorite positioning is with my subjects at a 45ish degree angle from the light source where you just start to see the upside down triangle of light on their cheek.
Play Ideas: baking, building (magnatiles, blocks [transparent toys are especially beautiful in pockets of light]), eating, water-play (if using water play up your shutter speed to capture the movement), interacting with animals, art activities (painting, drawing, beading, play-doh), investigating nature (using a magnifying glass to looks at leaves, feathers, rocks, nuts pinecones), and exploring a bowl of items (fruit, candy, marbles [choking hazard], ornaments).

Shooting Settings:
When shooting indoor low light images I typically reach for my 24mm unless I know ahead of time I’m aiming for really close up details. The 24 will distort the edges a bit especially depending on the angle you use so I will swap it out for my 35 or 50 instead. I usually shoot wide open to allow as much light in my lens as possible. I rarely go above an F stop of 2.5 unless I’m shooting a top down aerial perspective in which case I may go to f4. After I start with my f-stop of 2, and a shutter speed between 150-250 depending on how busy my kids are acting, I add necessary iso until the highlighted skin tones in my image are properly exposed. Do not be afraid of pumping up your iso as high as needed, I have found that it is way better to properly expose skin in camera and embrace the noise than try to increase the exposure in post.

Shooting Techniques:
My children are young and very fast so I tend to shoot quickly and I shoot from ALL kinds of angles. It’s a workout... I shoot far back to get the setting, close to get details working from the head down to toes (hair, eyelashes, hands, feet), I shoot flush with the floor, I grab a chair and shoot down from the ceiling. I often shoot the objects we are working with. And I’m moving the entire time walking around trying different lighting, spinning my kids chairs, sliding them to play in different angles. I autofocus using back focus and the center focal point. In some very low light situations I may have to use live view and manual focus to get spot on accuracy. **Tip** My kids are so sick of getting their pictures taken, so to help them participate for “eye contact shots” I use the following to get their attention: shoot them with nerf guns, roll a toy back and forth, blow bubbles, bribery, musical instruments, puppets, and pillow fighting lol.

Post Processing Workflow:
I often receive questions on how I go about post processing my indoor low light images so I have included my workflow below and my most commonly used editing tips. I hope you find them useful.
Lightroom
1. Download to Lightroom.
2.Cull photos down to favorites.
I glance over all my images once and rate 1 star to any I know for sure I want to delete, then I go back a second time with a more thoughtful eye and select 2’s if I want to keep them for memory purposes, 3 if it is a good image that if I’m desperate I can work with, 4 for strong images, and 5 for the showstoppers. In addition, I usually add a flag to the ones I want to add to my portfolio.
3. Edit in Lightroom Develop Module.
Global Adjustments
Global adjustments affect the entire image, I usually do them first.
Preset: I apply my Rembrandt preset which is a tweaked version of Mike Wade’s RLP2 ( I very much recommend his presets for indoor photography along with Meg Loeks Solstice Collection). Make adjustments to exposure, White balance, shadows, contrast, dehaze, camera calibration, clarity as needed per image. I often add some red into the camera calibration sliders to warm my shadows.
A note on White Balance: I shoot in Kelvin and I shoot on the very warm side. I personally feel Lightroom’s white balance adjustment sliders do a better job cooling down overly warm image than they do warming up a cool one.

Local Adjustments
Local adjustments only affect selected areas such as using the brush tool or filters. I have listed some of my most common enhancing local adjustments.
Dreamy Light Radial:
To enhance dreamy light, add large radial filter over light source lower dehaze, increase exposure a bit, and add a color tint (I select a color in the lower left area in the lightest shades of red through orange).

Smooth and Darken Radial:
When I’m shooting in low light I often find noise to be an issue, to help smooth, darken, and richen my shadowed areas, I create a radial filter around my subject, I make sure the invert button is not checked so it is only affecting the areas around the subject. Then I increase the denoise, lower the clarity a smidge, decrease the sharpness a bit, lower the highlights, and pull down the shadows. *Tip* When applying a radial filter or any local adjustment, watch your overlay mask. Most of the time you will want a softly feathered filter so it blends but you may need to erase some unwanted bleed over on your subjects. I use the shortcut “o” on my Mac to watch the red overlay mask.

Selective Sharpening Brush:
I’ll add a bit of clarity and increased sharpness to eyes, hair or any other important details.

Detailer Brush: I use this over anything glass. Contrast down, highlights down a smidge, whites up, blacks down...that is the base and I’ll paint that on at 50% and increase it as needed....depending on what I’m adding detail too, I may also add clarity and sharpness to it as well, change the tint, or bring down the highlights further. I typically use this brush when accentuating the details through a window. **Tip** When you deepen the blacks, add contrast, or go heavy on the dehaze slider, you need to keep an eye on your increased saturation. If your colors start to look too intense you may need to lessen your global saturation or vibrance slider a bit.

Photoshop:
If it is a fantastic image or it needs specialized fixes such as cloning, extreme noise removal, or fancy enhancements, I’ll send my images to Photoshop.
Photoshop Workflow:
1. Clean up distractions using cloning brush or healing tool, if composition is not optimum I may correct image by leveling it out and building out the sides.
2. Sharpen eyes if needed
3. To Further Richen: (I may try all three or only one)
-Add a Jessica Drossin texture overlay which I blurred and put on soft light mode and decrease opacity, I may add a layer mask and paint it off areas I don’t like.
-Add a levels layer on soft light and decrease opacity.
-Add a curves layer on multiply and decrease opacity.
4. Check my Tones: If my image is looking too red or yellow, I’ll add an HSL layer go to the Reds or yellows and pull down the saturation a bit.
5. Add any enhancing overlays for added umph.
-Duplicate layer again and depending if the image I’m working on is a portrait or more of an environmental storytelling image, I will take the image into Imagenomic’s Portraiture or Noiseware program, These programs just smooth everything out and I am drawn to more painterly feeling images. I made the duplicate layer so that when I make the adjustments if they are too strong, I can lower the opacity or create a layer mask and paint off the smoothed painterly look off of areas I want to keep crisp like eyes and other details. I particularly find the Noiseware program super helpful in lowlight images.
-Then I save the image back to Lightroom and export it ready to go.


I hope you guys found any of this helpful. I chose to heavily focus on post processing tips because I already saw so many great entries on low light shooting in the P52 educational collection. Just remember, practice makes perfect, the more you shoot and edit in low light situations the more comfortable you will feel. And above all, know it is a success to fail, do not feel discouraged if at first you struggle to create the art you have pictured in your mind you will get there. Baby steps! Just keep shooting.


Comments