Portraits by Tanya Montpetit
- Angie Mahlke

- Mar 14, 2021
- 8 min read
About me
Hello! My name is Tanya Montpetit and I am from Ottawa, Canada. I am a lover of light, composition, emotion and a storyteller through visual art. I’ve been working full time in the graphic design field for the past 20 years and studied Arts at the University of Ottawa. I have 2 beautiful children and an amazing husband who supports me in my work. I feel so much gratitude having this outlet that allows me to be creative everyday, to see the world in a new way and appreciate every little thing by being more mindful of them while I practicing photography. I am a proud member of Click Pro, a Clickinmoms community member and Clickpro Daily Project contributor.
Making things beautiful all around me has always been a passion from a very young age. Being moved by a simple static image always fascinated me and also brings me this indescribable feeling of connection with my subject.
A technique I really enjoy is the art of portraiture. There is nothing more beautiful and complex as a human face. What I find so magical about portraits is that everyone is so unique. We all have different personalities, passions and physical traits. Some of us are more extroverted, some introverted. We dress differently, depending of our mood and we are all attached to different objects that are very dear to us. For some, it is a hat, others, a baseball bat, a funky watch, a good book. So no session is the same and this is what makes the art of portraiture so exciting! Faces are an amazing way to connect with the viewer.

//////////////////////////////
What is in my camera bag?
I own and love my Nikon D610. My favourite lens is my Sigma 35mm prime ART. It is on my camera 80% of the time. I also use a Sigma 24-70 2.8 prime ART, a Nikon 85mm and 50mm 1.8, a Lensbaby Spark, Velvet 85mm and Sol 45. I am also a gadget lover so I also own a Lensball, an Opteka VL600 LED Magic Wand (like an ice-light) and a Neewer Camera Time Remote Control self-timer that I just adore and makes my self-portrait work so much interesting and easier.
I’ve been surprised by a great Youtube video couple of years ago of a portrait session with a twist, made by the Canon Lab. Take a look at it, it really changed my perspective of portrait photography! Here is the link: https://www.youtube.com/watch?v=F-TyPfYMDK8
The three words that defines my photography practice is emotion, composition and light. If I can nail these 3 in a picture, I know I will have something interesting. So today, I will explain briefly different techniques, that may sparkle your creativity when you will capture portraits. Hope this will help you define your voice and style and start practicing this such beautiful and powerful art. I am a photographer who works with my intuition and I let my muse guide me in my work. How I feel when I look at a photograph is whats important in my practice. If you have any questions, feel free to message me. I will be happy to help!
//////////////////////////////
My setting
Most of my work is done in my working Den in my house. I have gorgeous window light all day and I love the colour of the wall that complement the skin tones and my subjects. I’ve only bought a couple of backdrops on Amazon (Black and White) when I don’t want my setting to be at the same place all the time but I mostly photograph in this room.

Black and White / Colour Portraits
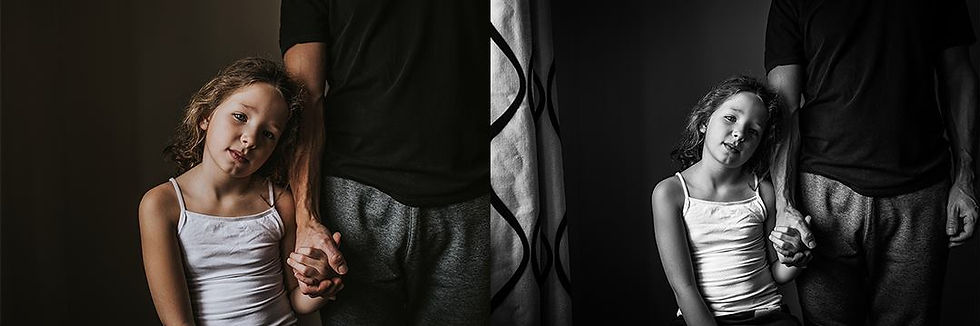
I just love experimenting with both colour and black and white photography. Depending on the mood I want to convey, they both have their strengths and beauty. I always ask myself: Which one would bring a better connection with the subject and which one would speak to my soul on a deeper level? I find that most of the time, I get my answer quickly by editing them both and looking at them side to side. It is also always a personal choice. On this case, I really like them both but since her skin tones are so dreamy on the coloured version, I personally prefer the first one. Never be shy to convert your pictures to black and white. It adds so much depth to a picture and in portraits, I can sometimes almost see the soul and personality of the person in a couple of seconds. So powerful!
Emotions / Personality
We as humans have so many emotions during the day and we are all built with different traits and fascinating personalities and this is what is so special and interesting when practicing the art of portraiture. When I work with children, I always ask them questions about what they love the most and also what they don’t like. For them, it is easier to express it and it is easier to get how they really are. What are there favourite toys, favourite friend, ice cream flavour… and the list goes on. Don’t be afraid to ask your subject some questions. I find it helps them to get more comfortable and I always get my coolest shots when they are thinking of what they are going to say next! Not every artist works the same way but I find that this technique works for me most of the time. Here are some examples of my nephew explaining while I was asking him some questions. It is not a problem for him to get in the frame and express himself as you can all see! Not every subject are like that. Some subjects (adults and children) are more introverted, and less demonstrative being in the centre of attention. Sometimes it can be more difficult as a photographer but I always try to embrace who they are but what is important is to capture who they really are and if they are more on the shy side, then I think it is great to get that in the picture. Just go with the flow, take many pictures and I am sure that you will at least find one that you will be really proud of.

Using Props
I also love to have my subject bringing some props to a session. It really can add an interesting perspective, highlighting the time of the year, something the subject loves or is passionate about or only to add a bit of fun and playfulness in the photo. It also helps to tell a story so that we feel more connected to them. Whether it is putting on some goofy sunglasses or hat, wearing eccentric clothing, or adding a prop that would describe a passion that the subject has, I find that it is always very interesting to work with them. Here as an example: I have some pictures of my husband who is a marathoner. It is passion. I wanted to capture his strength, his dedication and all the medals he won after many years of practice. Below some pictures of my daughter during Christmas time and Halloween. It was so much fun!


Using a Lensbaby Lens
Experimenting my portrait work with Lensbaby Lenses is such rewarding for me. I’ve always loved creative pictures with special effects. I own a Lensbaby Spark, Velvet 85mm that is a perfect for portraits and a Sol45. Here are some examples I’ve made with my Lensbaby Sparks and Velvet 85. You never know what you will get with these lenses but sometimes, when you get a good one, they are just what I wanted and it is so rewarding! Every photographers would at least need one Lensbaby lenses to experiment with it. It helps me when I am in a creative rut and need something to get flowing again.

Natural Light
I don’t work in a studio and I don’t own fancy studio lighting so I don't really know much about it for now but one of my favourite type of light for portraits is natural window light. For me, it just feels more natural looking, the skin looks healthy and I also find that all types of skins looks gorgeous, and true to its colour. My favourite spot for portraits in my house is in my den (first picture in this article). It has a beautiful window where the light looks so good whenever it is morning or afternoon, I always know that I will have great light to work with. In your home, discover where you can find beautiful natural light and place your subject near it. Experiment with different angles and see what you get. Try different spots in your house. In the bathroom, the kitchen, the bedroom, anywhere goes! Don’t forget to take close-up portraits too! They can be magical! (Last picture of my son in this section.)

Dappled Light
I just love it when I see streaks of interesting light glowing on walls or surfaces. Every-time I see one, I run and ask one of my family member (pretty, pretty please!) to place themselves to that specific spot and see how I can get creative with it. But I have a little tip… You have to be quick!!! If you wait too long, even if it is half a minute, you can loose the effect you want since light changes frequently. The sun will unfortunately don’t stay still, waiting your subject gets into place (bummer!) The picture I took of my daughter with a red round shape to her eye was made with her plastic magnifying glass that she got in her L.O.L. Doll kit. You can use all sort of objects to create cool effects. Here are some others to sparks your creativity! Prisms, Cooper ring, foil paper, dryer sheets, a Lensball, cardboard tubes, bubble wrap and many more!

Long exposure
Long exposure are a fun way to add a mysterious feel to your portraits. Here are some examples of self-portraits I’ve taken weeks ago. By adding these settings to my camera (ISO 1000, f/2.2, 1/200 seconds) with my 35mm and using my Neewer Camera Time Remote Control self-timer setting it to take a picture every 3 seconds for about a minute, I was able to get these by moving my head side to side and up and down. At the end, I was feeling a bit dizzy :-) but it was so cool to see the results! It can be a little trickier and not all your pictures will look good but I am sure you will be able to find some gems in them. Make sure to set your timer so that you can at least take 30 to 75 pictures, more if you want. Anything is possible with a self-timer and a tripod! I’ve only experiment with it a couple of times but I am sure if you want to know more about long exposure, there are many online tutorials that you can refer to.

Multiple exposure
I also just started experimenting with multiple exposure early this year. I didn’t had a clue how it worked! I’ve did a bit of research and looked at some online tutorials and discovered that it was not as difficult as I though it would be. All the pictures you see below are made with a double exposure but for the one on top, I’ve selected 3 shots instead of 2. I work with a Nikon but I am sure the settings should be almost the same for a Canon. Just check out your manual or online. As a graphic designer, I’ve been working with Adobe Photoshop for many years and I know it is something I can achieve pretty easily in it but getting these shots directly from my camera was so rewarding! If you want to start experimenting with this technique, after you have selected in your camera menu ‘’Multiple Exposure’’ and selected how many shots you want to take in your picture (2,3 or more if your camera allows it), ask your subject to position their head on the right and then for your next shot, ask your subject to tilt their head on the left side and then see what you get. It may take a bit of practice but once you figured how it works, the sky is the limit! The one on top is a self-portrait I’ve taken with my self-timer and I’ve set it so that it takes a picture every 2-3 seconds. I’ve selected ‘’3 shots’’ instead of 2 and voilà!


Comments