Artificial Light by Candice Gleason
- Angie Mahlke

- Dec 5, 2021
- 3 min read
Hi everyone! I'm Candice.
I’m so happy to be here with all of you. When people ask me what type of artificial light I use, it always makes me laugh. The funniest part about this question for me, is this….. I use a bright orange construction light!!!! Many of you, as I’ve come to find out, have them laying around in your garages hahahha!
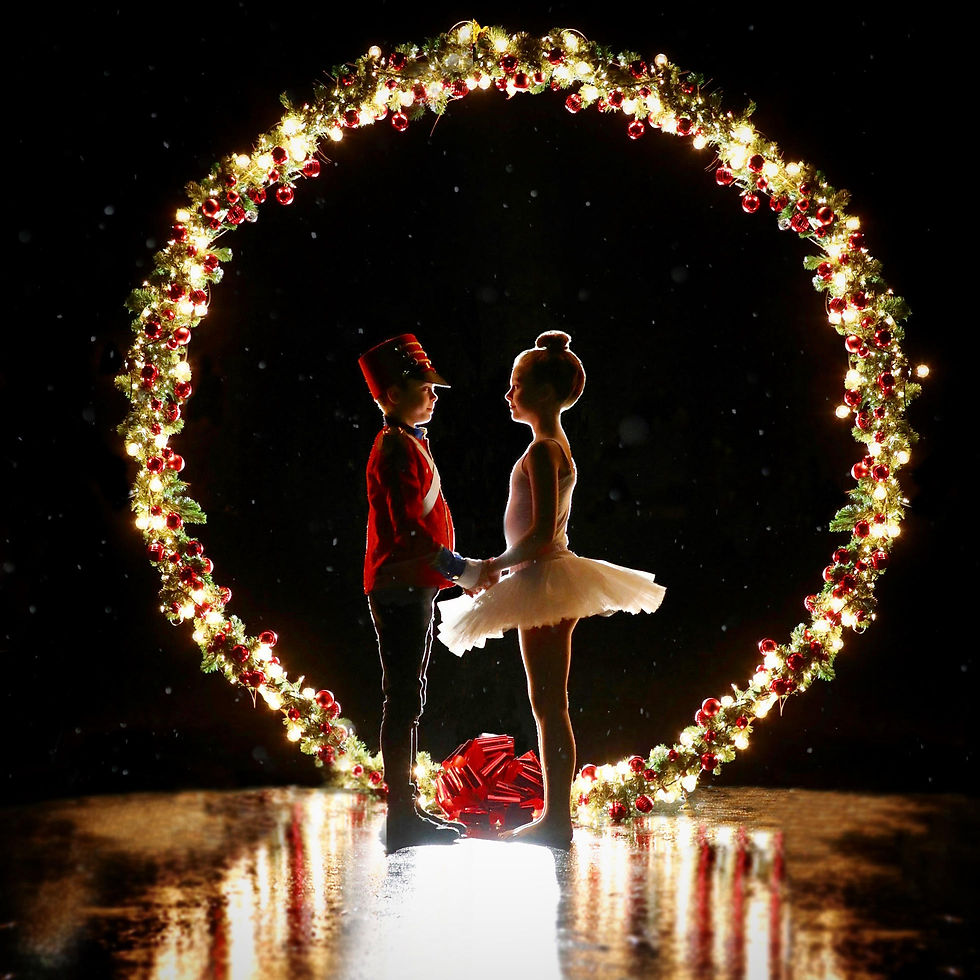
This is how my love for my bright orange light began….. I’m completely self taught, and I remember stumbling around Instagram as a new photographer, totally in awe of the talent that a lot of these women possess. Their talent inspired me!!! I knew I had to create this kind of magic! One thing that I kept seeing was night photos using car headlights, I loved the dramatic effect it would give but I didn’t like seeing the car in the my photos (just preference for me, I love everyone's work).


I started to look at photography lighting and they all carried such a heavy price tag, so off I went to Home Depot. I searched around a little and then I saw it, that big orange beauty was calling my name!!!! I got my brand new light home and started to play around with it. I realized one very important thing right away, my photos came out best when my model was directly in front of the light. I really loved the way the light would trace the outlines of my scenes. This type of lighting also came in handy when daylight savings hit and it was dark by 5pm.
So here are my tips for you:
Play around with whatever light source you choose. See what angles and lighting you prefer.
Don’t be afraid to experiment. The only thing that will happen if you hate your images is that you’ll have to try again.
Never give up. Ptience breeds beauty. Just like anything else, it will take a little time to find the sweet spot that works best for you.
Make it fun! The more fun you have, the better your images turn out. Photography using artificial light, especially at night, gives such a dynamic effect.


I’m going to give you my steps:
First, I run an extension cord out my front door to either my driveway or my street. We have a roundabout right in front of us which makes it easier for me to shoot in the road. The driveway works just as well.
Then, I hose down the pavement so I can capture a pretty reflection. I leave the hose out with me so I can spray down the road whenever I need.
Next, I set up my light, making sure it is far from the water source and the sprayed ground. I set my camera to the TV setting on my canon. This allows me to focus on the images I’m trying to capture and not have to worry about adjusting my settings continually. As night approaches you’re dealing with light and setting changes, this is something I do to simplify my process.
Next I put a leaf or a rock where I want my model to focus her movement. This allows us to both be very in tune with where she should be positioned, so the light plays with her instead of against her.

Here is a Behind-the-Scenes look at my set-up:
Voila! There you have it, that’s all I do to create my images using artificial light. I hope you found this helpful and please don’t hesitate to reach out to me with any other questions, I’m only a DM away :)


Comments