Black & White by Shay Cronin
- Angie Mahlke

- Mar 27, 2022
- 8 min read
Hello I’m Shay, I live in rural Canada with my husband (highschool sweetheart), my 3 wildflowers (daughters), and our handsome pup. I started my photography journey with landscapes and travel images when I caught the travel bug at 18. I lived and worked all over the world from Manhattan, Zurich to Moscow and all the way to New Zealand. From there it wasn’t until I had my first child, 7 years ago that I really stared getting interested in learning about my camera and what I could do with it! I started with the basics just a Nikon D3100 and a nifty 50mm. My home is old and rooms are tight, but I had to stay creative. This is where I truly fell in love with black and white photography. I would look for shadows and light in any part of my house. And I would try new things all the time (I feel now more than ever I need to take my own advice and start doing this more). At first I turned to B&W because I didn’t like my paint colours or really like my editing in colour so B&W was the easy route for me. It wasn’t until my daughter was about 2 that I really stared to love the story B&W images told, and it was from then on I began shooting for B&W. What I mean by that is looking closely to the light and shadows of the seen and using them to my advantage. I took this image in 2016 just as I stared this journey and although there are so many things I could have done better it tells a story.

This was the image that changed it for me. Something about the lighting and the shadows the details, everything. This was the moment I stopped just converting my images to black and white to hide my lack of colour editing skills, and started shooting for B&W images.
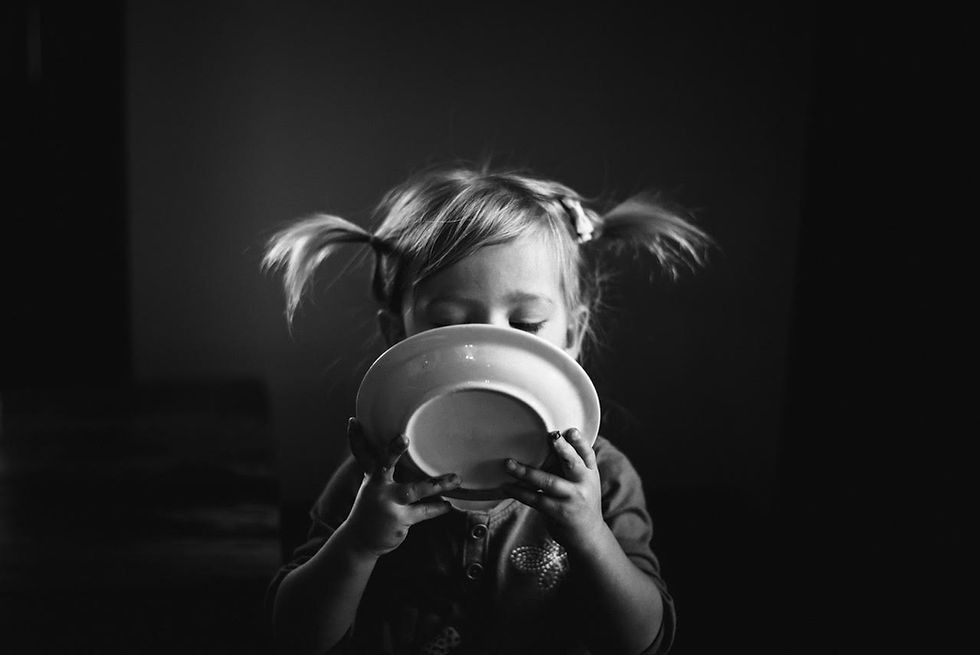
Indoor Portraits I have learned so much over the past 7 years thanks to outlets like this one, and other online learning tools (free & paid) but I am self taught. I still to this day only have 4 lenses (only 2 good quality) and one camera body that I use (and she is old). I am a natural light photographer so any image I present here is used with the lighting I find in my home. When I shoot B&W portraits I look for light and anything “interesting” like shadows, prints, texture, wall colours anything that may help with the story of my image. For example the image of my daughter here with faux fur and knits. This was all intentional because I knew if I placed her with side light I would get all the details from the light and shadows.

I did a similar portrait of my other daughter but took out a few of the textures to focus in on her big eyes. I still used side light because it is my absolute favourite for my indoor B&W portrait work. You can easily add more texture in the photo in Lightroom or Photoshop, it's all right there in the editing panel. I added a bit more clarity and texture to the fur in both of these images to really make it pop.

I use the light to really emphasize my subjects. This eliminates any unwanted elements in any image. So again here is another side lit portrait of my youngest daughter. I took out the textures in this image as to let the light hit just our skin. This image is a storytelling image I wanted to create to capture her size in my arms. I found that by shooting this for B&W it made it feel more timeless.

I love low light so much and especially B&W low light images. I loved the way the light hit my daughters skin and it made me focus on how tiny and fragile she is in my arms. By allowing the light to do the work in B&W portraiture it can help make your job so much easier. Its about where you place your subject and where you put your camera. Try taking multipole shots at different spots to find the “sweet spot”.

I almost always shoot wide open for my portraits (f/1.4). This allows me to focus on what I want the viewer to see, and at the same time creating depth in my images. I took this image while my daughter was in the shower. The sun was setting and we have a window right beside the shower. I ended up climbing in there with her and tilting the shower head to stay dry. The light was strong and made the water illuminate. I loved the texture that it gave to this image. As you can see I focused on her eye and then this gave me a sharp image but with the depth I desired.

I love capturing my girls in their natural settings as well with no props just using light and shadows. This image is one of my favourites because my middle daughter is always snaking and stuffing her face. Her hair and button up top was enough texture for me, but it was her eyes and the food stuffed in her mouth that really sold me on this image. I also added a bit of matte to the image to make it feel really timeless. This can be achieved in a variety of ways and you can play with your Lightroom sliders or presets in LR or PS.

Shadows are just as important as the light. And creating them with darker elements is a way to draw interest into your images. I used the dark wall in contrast to the light coloured wall to make my subject look more interesting. I also liked the shadows from her artwork to balance the image a bit more as well. I just had to turn her a bit so that I lost her left side to the shadows (doing this on purpose) It just looked more interesting to me as a final result.

Now obviously I love side light but this next image took me months to love. This was taken in our small bathroom using just the light from the sky light above. I tried editing it in colour first because I rarely take images with more “white” then black. I just started playing with it and once I did my conversion and played with the textures available I fell in love. It was her eyes that I focused on and then added texture to the bubbles. I added some more light and contrast to her irises and then went over ever lash with a dark brush. It wasn’t a lot of editing but “less is more” sometimes.

Outdoor Portraits
I rarely shoot B&W environmental images. If I do its usually in the early spring or really early winter (when all the beautiful leaves are gone). However it happens and I do love them. This image I took because it was very clear that the contrast and details would pop in this scene. I could see the depth from the trees that were overhanging and how my subject popped while standing in front of the lighter pathway. But what really sold me on this image was the lines and the light and shadows on the railing. Sometimes you may not see it right away and by playing with your images you may just discover how interesting they can be when you take the colour away.

Looking for contrasting light. You saw how I did this in my indoor portraits how I used the light to pick up on the details I wanted the viewer to see first. While shooting outdoors with a larger light source its important to pay attention to the contrasting elements. The lighter parts of the image will take centre stage so you may need to remove objects in the background that are lighter or move around your subject until you have a clean background. In the image below I needed to move slightly to remove the old boat in the background that would have definitely taken away from this beautiful moment my daughter was having with this duck. Note: it is easier to get it right in the moment (in camera) then to edit it out later.

This image looked “ok" in colour but again the colour was laking in the foreground and trees (just brown), so when I converted it I loved the detail in the closed and the light on my littles face. This edit was all about the texture of the sky. I used my “dehaze” tool in LR to bring the contrast up. I made sure to place myself to the side of the sun as I didn’t want any haze (it can really take the contrast away when looking for a beautiful B&W image). This gave me the light outline on her sweet face and all the way down her body. Remember you do not need fancy equipment for any of the shots I have shared. Using natural light and playing with your subjects position and your own while shooting can change your image drastically.

I know I’ve talked about texture quite a bit but in B&W portraiture it plays such a important role in creating an interesting subject. This image has so many different elements that make it visually interesting. From the receding water lines, to the rocks, to the whips in her hair: they are all telling the story of our adventure that day. To get that desired texture I had to change my perspective. The sun was getting lower so the haze was a bit much when I was just standing in-front of my subject. Instead I took the opportunity to use my height and my wide angle lens to change the outcome of my image. This will come with time, patience and a heap of practice. There will be images that don’t work and some you like right away and others you come back to months after you jumped right by. This is art, so be artsy with your images, your in control and as long as its still fun and enjoyable your doing all the right things.

This is a perfect example of an image I didn’t even consider right away. I skimmed right over it, but a month or so later I came across it and converted it into B&W, I just loved it. I love the shadow of the swing, the lighter leaves in the puddles and the texture of the grass. Her hat was purple her jacket green and her boots a bright blue… and I think that is why I initially skipped it. But once you eliminate those distracting elements you get this beautiful childhood story that gives my all the nostalgia feels.

The last image I want to share brings both my indoor portraits and outdoor portraits together. This was taken on our front porch. She was standing just on the step below the overhang and the light was hitting her side ever so sweetly. Its was mid day and if she was to move anymore toward the sun this image would have turned out completely different.
Can you guess what made me want to take this picture? Yes the light was yummy... but it was her eyes of corse. I think that was a common theme in most my B&W portraits. When in doubt focus on those eyes and make them pop. Look for contrasting light and edit your images to expose the details you want to shine. I always pump up the clarity in my B&W images. I want them to just out to my viewers.

I cannot wait to see what you all create.


Wow! This is great! Thank you for sharing! All your images are stunning!