February: Highlight Reel, 2
- Lindsay Craig

- Mar 2, 2020
- 7 min read
Updated: Mar 10, 2020
I truly loved exploring details with you all this month! Focusing on the details has really made me slow down and think about what I am trying to capture. Why am I taking this picture? What do I want to remember? What is specifically is speaking to me in this moment? From there I can decide, do I step back and include more of the scene to better tell my story, or maybe zoom in and really focus on the way something looks.
I loved seeing which details spoke to you individually and how you chose to capture those details. Here are a few of the shots that left me feeling inspired this month. I really wish I could feature them all, but the baby is currently crawling across my table and these kids aren't going to parent themselves;)
xoxo,

Gear: Nikon D500 with a Nikkor 105 macro
Settings: 1/30, f22, ISO 100
The Shot: Shot on my kitchen table with a black backdrop. Natural window light on the left and supplemented with an ott light on the front right.
Post Processing: Opened in Capture NX-D and increased sharpening, clarity, contrast and saturation

Gear: Canon 6D 50 1.4
Settings: 1/250 1.8 ISO 200 (auto WB)
The Shot: This is my middle child, everywhere we go someone comments on his beautiful eyes. He has these long lashes that curl so perfectly💙Capturing the details of my little people is my most favorite, as they change so quickly! - Natural light
Post Processing: Edited with SMAL01, removed grain, adjusted WB & exposure in LR

Gear: Canon 5diii, 35mm
Settings: F-1.8, 1/4000, iso-100
The Shot: Clicked at evening golden hour, kids returning home from school.
Post Processing: Edited in LIGHTROOM, adjusted highlights, shadow and contrast

Gear: Canon 6D Sigma Art 35mm
Settings: Fstop-2.0 SS-1/200 ISO-100
The Shot: I photographed this family a few months ago and could not resist focusing in on those precious, little hands.
Post Processing: I edited in ACR first to do most of my adjustments and opened in PS to finish with a clean edit from GTG actions(lots of tweaks).

Gear: Canon 5D Mark iii, Sigma 35 Art
Settings: ISO 100, 1/800, f/2.0
The Shot: We spent an unseasonably warm afternoon at the park. Some fish and ducks were clustered around the edge of the pond, where someone was feeding them, so my husband and son gently reached in the water and let the fish nibble their fingers. It was such a fun, unexpected moment, but I struggled to capture it because the curve of the edge of the pond meant I had to lean over the water to light it from behind. I kept my aperture fairly open because I wanted to keep the focus on the details of the hands.
Post Processing: SMAL 01 with tweaks, especially temperature. I also added a little bit of a radial filter to emphasize the hand even more

Gear: Canon 6D Mark ii and Sigma Art 35mm
Settings: ISO 400, 1/250, f/2.0
The Shot: Remembering the details of our home before we move on again to our next adventure this summer. Set my son up reading on the bed then lurked in the hallway to take the photo.
Post Processing: Edited in Lightroom with Dawn presets and some tweaks.

Gear: Fuji XT20 with 35mm f2
Settings: 1/250, f2.0, iso 1600
The Shot: Take as part of my 366 this year. I was struggling feel inspired on this day but when my middle daughter jumped in the shower I noticed her behind the water drops. I love how you can only see part of her through the shower screen and the cute heart she's drawing on the screen.
Post Processing: Edited in LR using Elena S Blair indoor preset as base, I also cloned out part of the ugly screen door!

Gear: Nikon d750
Settings: ISO 100 35mm f1.8 shudder 1/60
The Shot: My daughter came over to cut my husbands hair, I liked the light on head and details of the comb and clippers. Just the simple things in life.
Post Processing: I adjusted the exposure, contrast and clarity, brought up the shadows in general then brought down the shadows and highlights in the mid tones
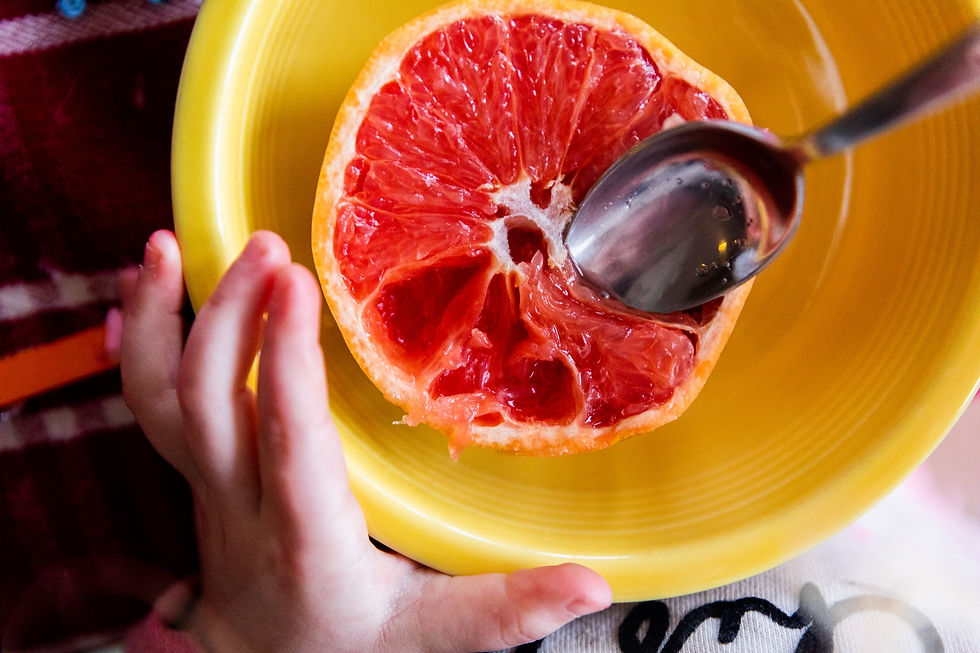
Gear: Canon 5D Mark IV Tamron 24-70 mm
Settings: 1/300 SS f 2.8 iso 600
The Shot: My daughter is like me when it comes to food, she eats everything 😂 I stood over her and snapped a few shots of her going to town on the grapefruit. Much of the light is from our kitchen windows.
Post Processing: I adjusted the contrast and brought down the highlights down a bit.

Gear: Canon 6D with 50 mm lens.
Settings: ISO 200, 1/320, 00 (freelensed)
The Shot: Freelensed to blur around my daughter and bring the viewer's eye to her.
Post Processing: Most of the work was playing with the Transform section to straighten out the lines. I also used a radial filter on my daughter to increase sharpness. I bumped up the vibrance and saturation.

Gear: Canon 5D Mark IV - 35 MM
Settings: ISO 200, F6.3, 1/1250
The Shot: Shot from above while playing at the beach with my son
Post Processing: Edited in Lightroom where I brought up the contrast and clarity while bringing down the darks on the tonal curve. Desaturated the oranges get a more appropriate color of sand.

Gear: Canon 6D with a Canon 35mm 1.4 ART lens
Settings: f/2.2 1/160 iso 500
The Shot: I shot this in the little space between my bed and our bedroom window. I intentionally cropped my eyes out of the frame just to try something different! I used my Canon app on my phone to focus.
Post Processing: I used a graduated filter on the left to further darken the shadows. I upped the contrast, lowered the blacks, increased the saturation, and used a radial filter to brighten myself and further sharpen.

Gear: Canon EOS RP + 35mm
Settings: 1/80sec, f/4, ISO 2000
The Shot: It was early evening, so quite dark and I was experimenting with both window lighting and using a reflector.
Post Processing: This has been cropped massively to focus on these particular petals against the dark backdrop; I lowered highlights a lot & partially decreased whites, plus increased shadows to emphasise the contrast. Finally, I added my own matte preset that I've created in Lr as I liked the muted effect.

Gear: Nikon D750 with Nikkor 35mm 1.8 lens
Settings: 1/100, f/2, ISO 5000
The Shot: I just happened to notice my son in his bedroom, sitting on the floor using his chair as a table to draw his “box people”. I had been wanting to capture this, so I grabbed my camera quickly and stood over him to get the shot. It was late afternoon so I didn’t have much light, hence the high ISO.
Post Processing: Straightened, adjusted white balance, bumped contrast, exposure, decreased shadows, decreased highlights. Radial filter around the box person to bump exposure a little more and fix a slight color cast from his jacket. Noise reduction. Reduced orange saturation.Then took it into Photoshop to clone out a sock on the floor in the top right corner of the frame.

Gear: Canon 5d mkiv with sigma art 35mm.
Settings: Iso 2000, 35mm, f1.4, 1/2000sec.
The Shot: i managed to bribe my littlest to come help with the washing just to get a few everyday images.
Post Processing: Edited In LR with archipelago LXC preset with a few tweaks.

Gear: Canon Mark III, Canon 24-70mm 2.8
Settings: ISO 1600, f/2.8, 1/320
The Shot: Closed all the blinds from other windows, leaving the only source of light coming from the top left of the image. Stood on top of a chair and shoot down onto the table, focusing on my subject's hands.
Post Processing: Custom basic edit in Lightroom; then overlay, color pop, color enhance and some dodge & burn in Photoshop; then back into Lightroom for a dehaze radial filter to make the window light pop more.

Gear: Nikon d750 35mm 1.4
Settings: ISO1600 f2.2 1/125
The Shot: We were on a 3 hour trip home and I looked back to see my girls on their tablets. I had them put their tablets a little closer to their face.
Post Processing: Simple edit, mostly in LR with lifting shadows, whites, added clarity. In PS I used GTG actions to make the image more rich.

Gear: Canon 6d sigma 35mm
Settings: 1/800 2.8 iso 100
The Shot: All natural evening light. I was cooking dinner and he was keeping himself busy - I couldn’t resist the warm light and deep shadows and that cloth diaper peeking out of his pants .
Post Processing: Smal presents - lifted exposure a tad, took down black and shadows, added clarity and a bit of dehaze.

Gear: Nikon d750, Nikkor 105mm 2.8
Settings: 1/250, f3.5, ISO 400
The Shot: My oldest girl lost her top tooth at breakfast that morning and had the biggest smile on her face all day. My goal was to try to capture the tooth, her big proud smile, freckles and the wispy hair that is always blowing in her face.
Post Processing: I converted this image to black and white in LR, increased contrast, lifted shadows and brought down the whites.

Gear: Sony a7iii 24-70 @50mm
Settings: f/3.2 SS 1/50 ISO 4,000
The Shot: This was shot in a train exhibit at our union station. I wanted to capture the detail of his reflection and his serious face- he takes the train exhibit very seriously! :) It is VERY dark in the station with lights only coming from small overhead lights and then the exhibit lights around the trains. Nothing fancy to shooting this. I juststood in front of him and propped my elbow on the ledge his hands are on to steady myself a little more since my SS was so low.
Post Processing: I edit in Lightroom: I did a radial filter around him to increase exposure and a radial filer around his reflection to increase exposure and texture. Decreased shadows, highlights and exposure a little.

Gear: Nikon D7000 and 50mm lens
Settings: f/1.8, 1/4000s, ISO 125
The Shot: This hairy guy was poking his nose right up close to the fence in between mouth fulls, so I leaned in as close as I could and took this detailed shot. This was taken mid-day and it was very bright out so I pulled my ISO way down. I actually liked the sun was falling starkly on just a portion of hairy copper face, so I just snapped away!
Post Processing: I used Adobe Photoshop to edit this image. I usually always start with pulling down my highlights. I used a combination LXC and Brixton Film presets along with a SMAL tone preset to give a tint of warmth to the image. I reduced the grain a bit and added a little vignette to it to enhance the moodiness and deepened the shadows. Finally, I used a highlighter brush to brighten his fur and snout and added a matte overlay to give the image a softer feel.

Gear: Canon 6D Markii, 50mm 1.8
Settings: ISO- 100, SS- 1/200
The Shot: Reverse Freelensed
Post Processing: Lightroom edit- I raised the contrast and then used the brush to add a little clarity to the frozen drop.

Gear: Nikon d750, sigma 35
Settings: ISO 100/ f 2.8/ ss 400
The Shot: Sunrise, looking in through the window
Post Processing: SMAL preset, dehazed quite a bit, warmed it up


Beautiful images!