September: Highlight Reel, 2
- Emily Flodstrom

- Oct 4, 2021
- 5 min read
I'm not going to lie, you guys absolutely killed it this month with self portraits! It was incredibly difficult to pick a handful for this highlight reel, but I want EVERYONE to know that their images were fantastic. It's such a vulnerable thing to get behind your own lens, and then share the images with the world, and all of you have definitely been seen! I hope this month has helped empower and encourage you all to continue to get in the frame, regardless of what technique we are focused on! Peace, love, and soggy cereal,

Gear: Sony A7iii with Sony 24 lens
Settings: ISO 4000 f3.2 1/80
The Shot: My afternoon was really frustrating based on a series of things that went wrong. I had confirmed my husband would be home for dinner before committing to making homemade ramen that took a long time. But, he was really late and didn't make it. I ate alone while my 3 year old whined at me. I grabbed my camera to document it and it immediately diffused my frustration to channel it into creativity. So happy I got this shot!!
Post Processing: I edited in PS by compositing two images together from the series of her and me picking my favorites.

Gear: Nikon d750 and sigma 35 1.4 art
Settings: f2, 1/200, ISO 100, OCF at 1/16th
The Shot: Decided to make a birthday themed self portrait. Made funfetti pancakes to celebrate. Set my camera on a box and my flash on a box on the kitchen table
Post Processing: Edited in LR. Pulled exposure down some and pulled down darks.

Gear: Canon 6D Mark ii, Lensbaby Sol 45, Sigma 35
Settings: Background: ISO 1600, f/3.5(fixed), 1/200; Portrait: ISO 800, f/4.0, 1/250
The Shot: I shot the first image in a heavy rainstorm through my truck windshield (while my husband drove) with my Lensbaby. I later shot a portrait of myself against an empty white wall in my house using a tripod and my camera's ten second timer.
Post Processing: I edited this in Photoshop. I expanded the canvas of the background image to set the headlights in the center of the photo. I then isolated myself and added myself to the background photo, lowering opacity and using a layer mask to create a ghostly feel and help the headlights shine through.

Gear: Canon 6D Mark ii 50mm
Settings: 1/250sec f 2.2 iso 1500
The Shot: I took this as part of the meet the mods self portrait at honestly parents. I wanted to show what the typical morning was actually like in our life. Lily and I are slow risers…jj not so much. Camera was on an end table and shutter using my phone connected wirelessly to camera.
Post Processing: Edited in Lightroom to raise shadows and tweak colors.

Gear: Canon Rebel T6, 24mm
Settings: ISO 400, f2.8, 1/100
The Shot: I set up a black trifold poster board behind me with patio slider window light to my left about mid-afternoon. I set my camera on my tripod and used the Canon Connect App on my phone to make adjustments and to use the shutter release
Post Processing: edited in Lightroom by converting to black and white, adjusted exposure. Decreased highlights and increased shadows and blacks. I painted on some additional exposure on face and shoulders. I used another brush to add more clarity to my hair, eyes, and lips. I took it into Photoshop to remove some stray hairs and my necklace using the spot healing brush. I brought it back into Lightroom and added a little more exposure to my eye

Gear: Nikon D750, Nikkor 50mm 1.4, yuongnuo speedlite, 1 white shoot through umbrella, and a trigger, 2 white foam boards
Settings: ISO 2500, f/5.0, 1/100
The Shot: The first part was to blow out the background as much as I could. I just opened the doors in my bedroom and set the camera so that the back would be blown out. Then, I used 2 white foam boards in front of me to reflect light onto my face. Lastly, I set up an OCF with a trigger. I used a white shoot through umbrella, but actually bounced the light off of the umbrella vs shooting through. The zoom was set to 105mm and the flash was 1/128 *I think
Post Processing: In lightroom, I corrected the white balance, added both contrast and clarity and decreased the shadows to bring in more depth in my face. Photoshop: I did frequency separation to clear up skin, I dodged and burned eyes and sharpened them as well, and I finished removing the green from the background that was still there. I did that by using a tone curve and lifting the shadows super high, then inverted the layer and brushed off the green
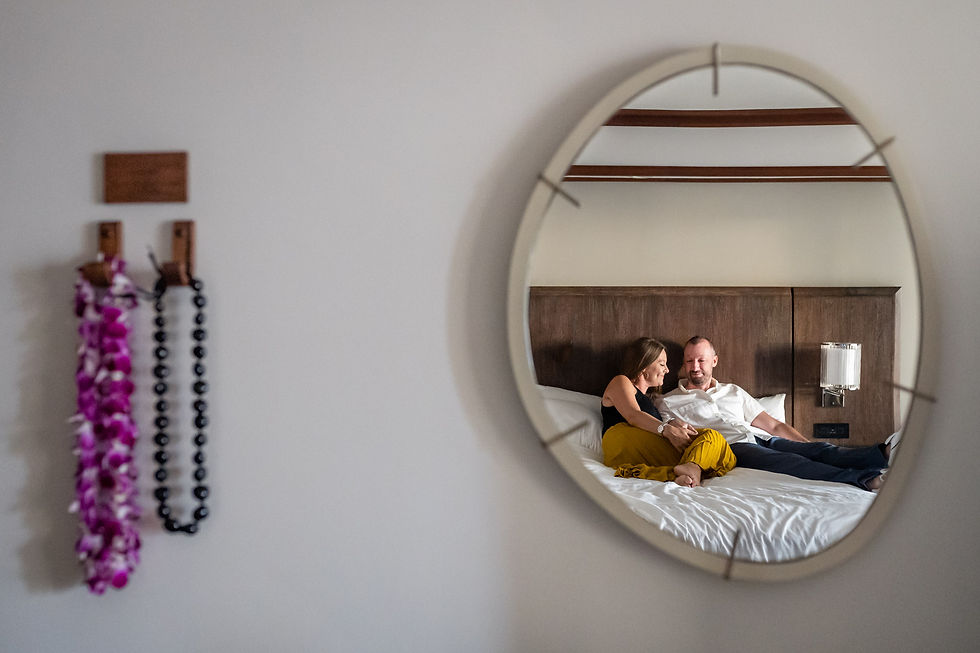
Gear: Sony a7iii + Sigma 35mm art lens
Settings: f/2.5 1/200 iso 10,000
The Shot: I shot this image while my husband and I were on our anniversary trip. I didn’t bring a tripod so I had to get creative: I stacked a small patio side table onto the ironing board . I knew I wanted the leis in the image to speak to the setting (Hawaii!) and then the mirror framing us. I set focus on my husband, set the timer, and snuggled in next to him.
Post Processing: I edited this creating contrast with the selective tone curve panel. I brightened the purple lei with the purple luminance slider in the HSL panel and I used a radial filter around the mirror to brighten the wall around it.

Gear: Canon 6D 35mm
Settings: ISO 320 3.2 1/640
The Shot: I decided to recreate one of my favorite images from 2017, where my daughter stood in the window waving at her brothers on the bus. I thought it was fitting since now it’s just me waving at the bus with all my babies in school full time. This image was a hard one for me and I ended up shooting it over two mornings. The first attempt I metered for myself but I ended up blowing out the top of the bus so much, it was unrecoverable. The second attempt I metered for the bus, but then I was too underexposed. I decided to do a composite with both images.
Post Processing: I first edited both in Lightroom and then brought them into Photoshop to do the composite. I used the original image with the blown out bus as my base. I copied the whole window from the second image, the properly exposed bus, and pasted it as a layer on the first image. With a layer mask, I tediously made the layers merge to appear like one image.

Gear: Canon R6 with canon RF 28-70 mm lens at 53mm.
Settings: 1/250, f3.5, ISO 4000
The Shot: My poor 4 year old has been neglected lately because of PTO and church duties of mine, so she started entertaining herself by doing my hair while I was working on my computer. It was a moment I wanted to capture since she does it fairly often so I set my camera on a couple books on the island of our counter and set it on a timer to take pictures every few seconds. This was my favorite picture, but I actually got a few I love of myself alone when she ran to get hair accessories or a different brush. Also, my hair has never been so smooth, lol.
Post Processing: Edited fairly minimally in LR. Decreased highlights, increased vibrance. Increased luminance to help with a little grain. Opened in PS to add a custom vignette and dodged my daughter and myself a little

Gear: Canon EOS 100D Lensbaby Velvet 56
Settings: f/2.8, ISO 100 1/80
The Shot: I wanted to do a self portrait with my new Lensbaby so I set it up on my tripod and used the timer to take a bunch of shots in the morning light shining through my front door.
Post Processing: I increased contrast, fixed my skin tone a little, then added various overlays for pretty effects.


Comments